Microsoft Designer is a free AI design app that turns a written description into images, stickers, invitations, greeting cards and social posts, and it can also edit your own photos. You don’t need design skills or paid software, just a Microsoft account. This guide shows you how to create your first image, write better prompts, edit photos and make the most of your free monthly credits.
What you need before you start
- A free Microsoft account. You can open designer.microsoft.com without signing in to browse ideas, but you need to sign in to create.
- A web browser or the Designer mobile app. Microsoft also offers a Designer app for phones, and some Designer features are built into Microsoft apps like Photos, Word and PowerPoint (the Word and PowerPoint integration needs a Microsoft 365 Personal, Family or Premium subscription).
- Meeting the age requirement. Microsoft says generative AI features are limited to people who meet minimum age requirements, which vary by region, so Designer may not be available on some personal accounts.
Step 1: Open the Image Creator
Go to designer.microsoft.com. The home page offers three paths: Create with AI, Edit with AI and Design from scratch, plus shortcuts for images, icons, wallpapers, invitations, banners and posters. For a picture made from your words, choose Images. You’ll land on the Create an image screen, with an Explore ideas gallery of examples and a My images tab where your creations are saved.
Step 2: Describe your image
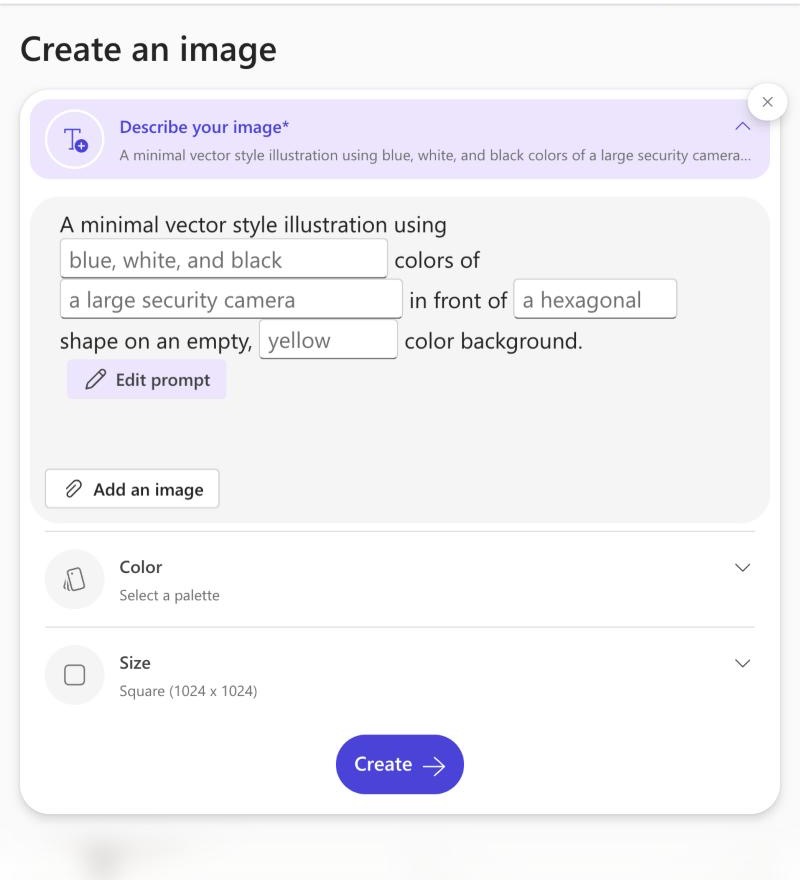
Click Describe your image and type what you want. If you’re not sure where to start, pick any example in Explore ideas: Designer loads its prompt as a sentence with fill-in-the-blank boxes, so you can swap the colors, subject or background without rewriting everything. Click Edit prompt to change the whole sentence, or Add an image to upload a picture for Designer to work from.
Good prompts usually answer four questions:
- What is the subject? “A golden retriever puppy” works better than “a dog.”
- What is the style? Try words like watercolor, minimal vector illustration, photorealistic or color block.
- What are the colors and background? For example, “pastel pink and mint colors on a plain white background.”
- What is the mood or lighting? “Soft morning light” or “glowing neon at night” changes the whole result.
Microsoft’s own example prompts follow this pattern, for instance a minimal vector illustration of a security camera in blue, white and black on a yellow background.
Step 3: Pick colors and a size
Below the prompt, open Color to choose a palette, then Size to pick the shape of your image. There are three options: Square (1024 x 1024) for profile pictures and Instagram posts, Portrait (1024 x 1536) for phone wallpapers and stories, and Landscape (1536 x 1024) for blog headers, banners and desktop backgrounds.
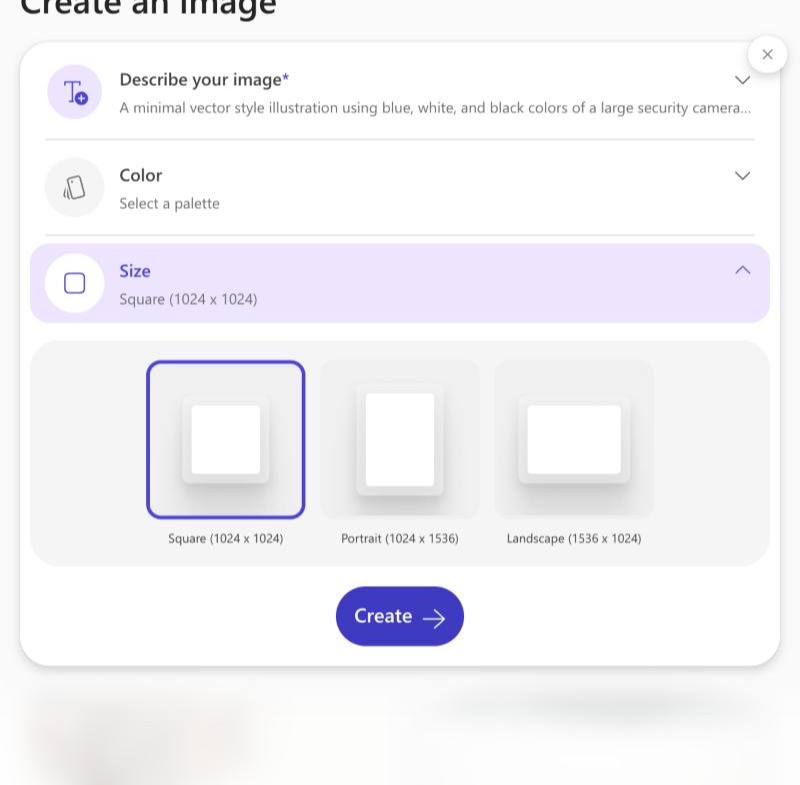
Step 4: Create, pick and save
Click Create. Designer generates a set of options to choose from. Open the one you like to download it, or keep refining: change a word in your prompt and create again. Small changes, like swapping “photorealistic” for “watercolor,” are the fastest way to get closer to what you imagined. Everything you make stays in My images.
Step 5: Edit a photo with AI
Designer isn’t only for new images. With Edit with AI, you can upload one of your own photos and, according to Microsoft:
- Move people or objects, or erase unwanted distractions.
- Restyle the photo for a new look, or add a decorative frame.
- Blur or remove the background so your subject stands out.
- Crop, add text and resize the design for the platform you’re posting on.
How credits work (and what’s free)
Designer is free, but its AI features run on credits. Microsoft says you get a fresh set of credits at the start of each month, and 1 credit is used each time you use Designer’s AI features (such as creating an image from a description) or Copilot in other Microsoft apps. The old “boosts” system is gone: Microsoft says every image is now created at the quickest available speed.
If you run out, Microsoft 365 Personal, Family or Premium give the subscription owner up to 4 times more credits, shared across AI features in Microsoft apps. For occasional use, the free credits are enough to try the app properly, so start there before paying for anything.
Tips for better results
- Start from an example. Editing an Explore ideas prompt teaches you what wording Designer responds to.
- Be specific, but keep it to one idea. One clear subject and style beats a long list of unrelated details.
- Choose the size first. Picking the right shape before you create saves credits you’d otherwise spend redoing an image.
- Check any text in your images. AI image tools can misspell words inside a picture. If the text matters, add it afterward with the editing tools.
Microsoft Designer vs. Midjourney
Designer is the easier starting point: it’s free to try, works in the browser with a Microsoft account, and adds templates and photo editing. Midjourney is a paid service aimed at people who want more artistic control. If you want to compare, read our guide on how to use Midjourney in 2026. For more ways to put AI to work, see our explainer on ChatGPT, GPT-6 and Codex.
Sources: Microsoft: Microsoft Designer, Microsoft Support: Frequently asked questions about Microsoft Designer, Microsoft Designer (designer.microsoft.com)